How to start expanding your chord sound
There is a lot of emphasis in the guitar community on soloing and technical ability. It seems that everyone wants to be able to play fast and clean, which is understandable. Those are important areas to work on if you are interested in becoming a well rounded player.
However, what is an often overlooked aspect of playing, that has arguably even more importance in the world of being a successful guitarist, is chord vocabulary.
Rhythm playing is not as flashy or impressive as lead playing, but if you want to play with other people it is 95-99% of what you need to know.
If you are a working musician, or you aspire to be, most of what you’ll be doing is playing rhythm, so becoming well acquainted with ways to improve that side of your playing are worth paying attention to.
In the spirit of exploring how to do this, I’ve put together some ideas for you here on how to add motion to common chord shapes.
Once I learned how to embellish the chords I knew with notes that surrounded the chord tones, I started to figure out how to create chord melodies in an organic way.
By Learning the melodic notes that surrounded the chords I knew, I learned how to create chord melodies for any song with ease.
This has become one of my favorite things to do. I think of a song that I know the melody for (in my head only, haven’t ever tried on guitar) and I can almost immediately harmonize it and create a chord melody, if the melody isn’t too intricate.
I’ve harnessed this ability in my professional life to learn songs very quickly for when I perform at wedding ceremonies or special events. In any situation where people want specific songs on solo guitar, I’ve used this to great success.
I often don’t even need to pick up a guitar to write a chord melody, because I can hear in my mind how the melody interacts with the chords, and see the shapes in my head.
If you are new to this, it will take a while to get to that point, but I’d like to show you some ideas of how you can develop the patterns of thinking that will get you there.
Here’s how to use these diagrams
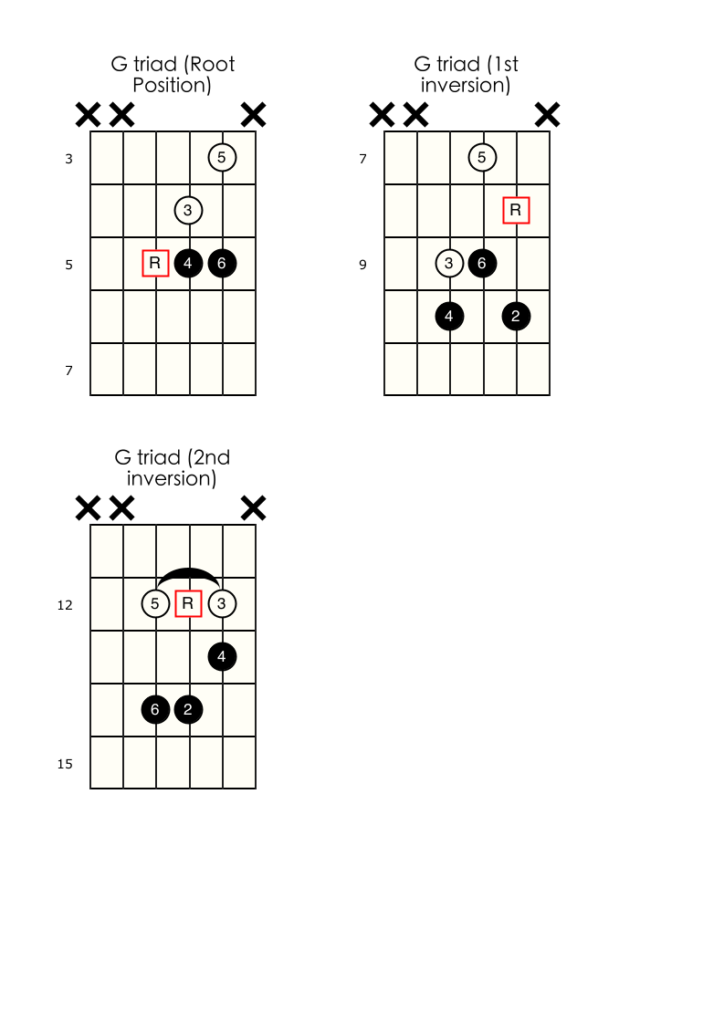
I’ve created a series of diagrams for you to practice this concept. The basic chord shape will be represented by the empty circles & squares; the squares being the root note of the chord, or the note that the chord is named after.
To make this simple I’ve used the key of G as our example for today, and targeted 3 voicings (aka chord shapes) that I find the most useful. These voicings target the 2nd, 3rd and 4th strings, and represent the 3 inversions of the G chord.
Inversion = different arrangement of the same notes, creating another version of the same chord.
For example, the G chord is made up of the notes G, B and D. These three voicings are those three notes arranged in different ways to make 3 different inversions of the G chord.
The filled in circles are the variable notes. These are notes that you can play while holding the chord shape to create melodies around these chord shapes.
How to try these ideas
- Start by finding the chord shape by using the shape indicated in the open circles. Then use your other fingers to play the variations (represented by the closed circles) one at a time.
- Play each variation note with the chord as a whole, and then try playing each note in succession.
- Follow this by moving back and forth between the base chord and the variation, to hear how they sound when they interact with each other.
- Create a rhythm using the chord, and then the variation. Try to create a simple melody that you can repeat, and see what you like.
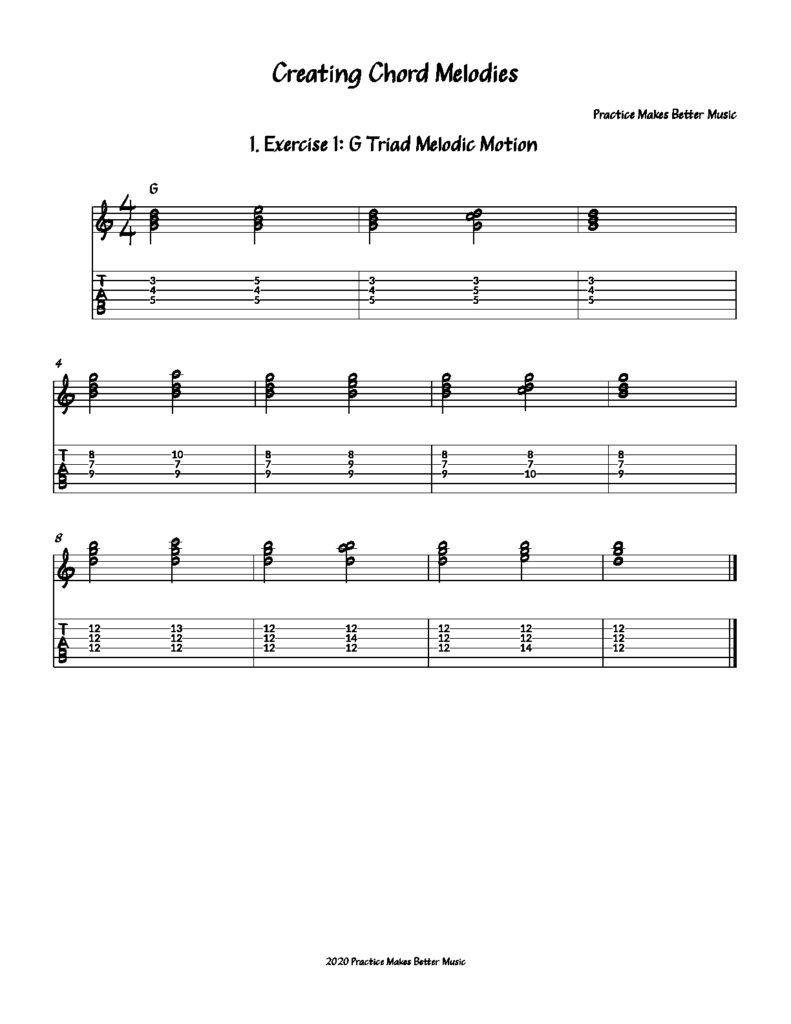
- Reference the tablature/sheet music for a more detailed example of what I’m talking about.
- Have fun!

Free PDF available for sheet music
The image below is a little hard to see because of size restrictions, so if you’d rather just download the pdf of this, here it is.


Leave a Reply
You must be logged in to post a comment.